SD card backup image
When the magnetometer arrived from Dr Steve Marple of Lancaster University, the image on the Raspberry Pi image had not been expanded, so that we can make up a backup of the initial configuration. This will allow us to recreate the initial configuration on an SD card in the future, in case of anything going wrong.
NB The image does need to be expanded to fill the whole SD card when the Pi is run. Logging in as pi and running
sudo raspi-config
will enable this to be done, selecting Expand Filesystem, and then Finish followed by rebooting the Pi.
The manual [PDF] manual has a section on configuring the SD image. We can ignore that, as this has already been done at Lancaster. The SSH host keys have also been regenerated, so the ones on our Pi are unique.
Generating the backup image
The method we used to create the backup image was found on the raspberry pi forums. We used a KNOPPIX liveCD running on a staff laptop to complete the backup, and the instructions below are adapted from the method linked to, but with the actual commands we used.
Since the SD card is bigger than the partitions there is no need to copy the whole card. It is quicker and uses less hard drive space to store the image is we copy just what is needed.
- Boot up KNOPPIX on laptop.
- Open file manager and find somewhere to store the image (somewhere on the hard disk of the computer).
- Open a terminal and run
$ cat /etc/mtab - Insert the SD card into the SD card slot on the laptop. You should see some extra devices appear in the file manager, and if you run the previous command again, you will find some new devices are mounted. These will be the SD card. In our case, the extra devices are
/dev/sdb1and/dev/sdb2. - In the terminal, you can check the SD card partitions out visually with
$ gksudo gparted /dev/sdb &
This will show the partitions on the SD card, in this case occupying about 3GB: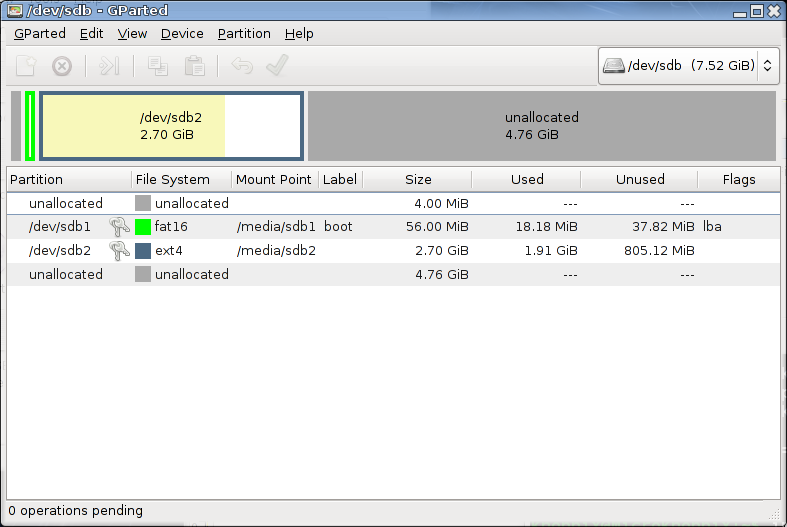 The MBR is stored in the the first 512 bytes of the disk. It consist of 3 parts:
- The first 446 bytes contain the boot loader.
- The next 64 bytes contain the partition table (4 entries of 16 bytes each, one entry for each primary partition).
- The last 2 bytes contain an identifier
- To save the MBR into the file
mag-mbr.img:
$ sudo dd if=/dev/sdb of=/media/sda2/anorman/mag-mbr.img bs=512 count=1 - Now it is possible to save each of the partitions into a backup image file:
$ sudo dd if=/dev/sdb1 of=/media/sda2/anorman/mag-partition1.img bs=1024

$ sudo dd if=/dev/sdb2 of=/media/sda2/anorman/mag-partition2.img bs=1024 - These image files can be compressed if desired, to save space on disk.
Restoring from backup image (untested)
This section details how to restore the SD card from the images created above (be careful : this could destroy your existing partition table and with it access to all data on the disk).
Step 1: Restoring MBR
This is dangerous. You must be certain that the MBR image with the Partition Table matches that of the partitions you are going to put into them otherwise the data will be corrupt on the SD Card.
$ sudo dd if=/media/sda2/anorman/mag-mbr.img of=/dev/sdb
If you only want to restore the boot loader, but not the primary partition table entries, just restore the first 446 bytes of the MBR.
$ sudo dd if=/media/sda2/anorman/mag-mbr.img of=/dev/sdb bs=446 count=1
To restore only the partition table.
$ sudo dd if=/media/sda2/anorman/mag-mbr.img of=/dev/sdb bs=1 skip=446 count=64
Step 2 - Restore the Partitions
$ sudo dd if=/media/sda2/anorman/mag-partition1.img of=/dev/sdb1 bs=1024

$ sudo dd if=/media/sda2/anorman/mag-partition2.img of=/dev/sdb2 bs=1024

